Chalk it up!

Standard

Throughout all of our crafting adventures, we have found that chalk board paint is one of the “must haves” of our materials. It can transform anything into a unique and functional piece for your home, office or classroom. When you use chalkboard paint, keep a few things in mind:
1. Read the directions on your paint can. Most chalkboard paints require a particular amount of layers and drying time between those layers.
2. Use roller brushes for larger surfaces. Roller brushes leave less streaks than small foam or paint brushes.
3. Be creative! Chalkboard paint looks good on a variety of projects, so think outside of the box and have fun with it!

Here are some projects that my mom and I have made using thrift store finds and chalkboard paint.
Chalkboard Paint and Mason Jars Chalkboard Paint for Kids Chalkboard Paint Message Board

I also wanted to share some good resources for more creative ideas:
HGTV: Top Chalkboard Paint Ideas
“Chalk It Up: 40 Creative Ways to Use Chalkboard Paint”
Rachel Ray’s 7 DIY Chalkboard Paint Ideas

Have fun chalking it up!

Stylish New Stool

Standard

While browsing Pinterest I found some pins about reupholstering furniture, and I thought, “We could do that!” On our next trip to GoodWill I happened to find a small footstool that was perfect for our next project! This particular stool had terrible orange and green upholstery and definitely had a scent that reminded me of my grandmother’s attic. But, it only cost $4.99 so it was perfect for our first attempt at reupholstering.

footstoolfootstool upholstry

In order to up-cycle this piece we needed a few things: upholstery material, foam padding, spray paint and any decorative pieces to give the stool that extra touch. We went to a fabric store to get the material- most fabric stores have a clearance area where you can get material on sale. So, we chose from a huge pile of upholstery material and found a dark gray material for only $8 per yard. We also decided to find some decorative nails to use to decorate the stool once we reupholstered it. We found the foam padding in the same store, which made our shopping very quick!

When we got home we took a look at the way the material was cut and sewed. The stool was round and we wanted to make sure we kept the material for a reference as we made a new cover. Then, we removed the material and the padding underneath. Once we did that we were able to measure the base of the stool to see how big we needed to cut the foam and the fabric. As my mom took care of cutting the material, I spray painted the legs of the stool a neutral and clean white.

Once the legs were dry, we placed the foam on top of the stool base and fitted the material over it. Then, we stapled the material to the bottom of the stool. The entire process of cutting, sewing and attaching the material can be done a few different ways. We watched some YouTube videos to get an idea of what we wanted to do. Here is one that we found to be helpful:

Our last step was to add the decorative nails to the stool. We wanted to add these to give the stool a more contemporary look than it had before. We chose a silver color because we wanted something fairly neutral that would still stand out. Once that process was finished, we had a great new footstool to add to a living space!

new footstoolnew footstool2

Rescuing furniture from thrift stores, garage sales or even your own home can be such a fun project. If you would like to try it but you need some ideas, check out the DIY Network’s “Furniture Rescue and Repair” page for some inspiration.

Antique Desk

Standard

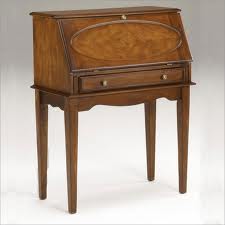
One of our best GoodWill finds yet was an antique drop-down desk, similar to the one pictured below.
drop down desk

When my mom and I look for furniture to up-cycle, we look for a few things:

1) It has to be made out of quality material. For example, if we buy anything that is wood, we make sure it is made of real wood and not particle board. This ensures that we will have a piece that will last us a long time, and will look good when we stain or paint it.

2) It has to be priced reasonably. We always consider how much the item costs first, then we think about the cost of the materials that we will need to up-cycle it. If the piece is too expensive, the project isn’t as fun and we might not make anything if we resell it.

3) It has to be unique! We always want a piece that looks unique in some way. We want it to be a special piece- one that we couldn’t find easily in a store.

This desk had everything on our list. It was made of quality wood, it was $9 and it was antique. It even came with the original, old fashion key! This was the perfect project for us.

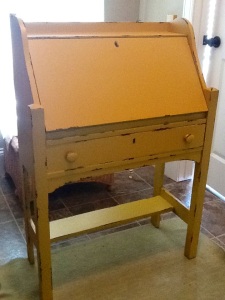
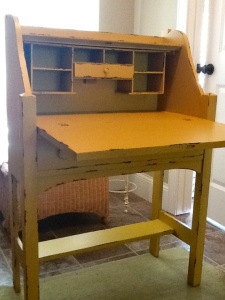
We decided that we wanted to paint the desk rather than staining the wood. I chose to keep this piece for my office, which needed a pop of color, so I decided to paint it a goldenrod yellow. Our goal was to maintain the antique feel of this piece, so we used a distressing technique rather than painting it so it looked brand new.

The first step we took was to sand the desk- we always sand anything wooden so the paint applies nicely. Next, we used Vaseline to line the edges of the desk (the Vaseline protects the wood from paint.) We applied it randomly so it looked like the paint had been chipped over a period of time, giving it an antique, distressed look. Next, we used a spray gun to apply two coats of paint. We left the desk to dry for 2-3 days before we were ready for the last step. Our final job was to wipe away any spots on the desk where we had used Vaseline. We used an old towel and simply wiped away each area (these are easy to spot because the paint looks shiny in the areas with Vaseline.) The paint came off easily and it looked great!

Now I have this great desk that will add a bit of color and character to my office!

desk 2 desk 1

If you’re interested in upcycling your own furniture, check out the DIY Network’s video gallery for some great instructions and ideas.

Up-Cycling Jewelry Boxes

Standard

While wandering through a craft fair, my mom and I spotted one of the trendiest projects we’ve ever seen- up-cycled jewelry boxes! We rushed over to the table to check out the woman’s projects, and were blown away by how cute they were…and how expensive they were! As we wandered away from her table (knowing we weren’t going to spend $70 on an old box) we realized that we could make them ourselves. So began our first crafting adventure together…

To begin our projects, we decided to go to a GoodWill store to find some jewelry boxes with potential to look fabulous. So, we rummaged through the shelves and found a couple to begin with. We had decided earlier to choose a couple of spray paint colors and a variety of scrapbook paper to transform this old-fashion boxes into something contemporary.

Our first step was to sand the entire box, then prep it for painting. This was a lot more work than either of us anticipated. We removed all of the hardware, and covered the inside of every drawer and opening so that the inside of the box wouldn’t be sprayed with paint. Then, we painted about two layers of paint on the box (depending on how dark the wood was to begin with.) We prefer Valspar spray paint. We’ve found that this paint goes on the best, and doesn’t run. (Hint: you can only get this brand of paint at Lowe’s, so don’t waste your time looking anywhere else!)

After one-two days of drying, we removed all of the precautionary painters tape from the inside of the drawers (all of which covered the interior of the box.) Then, we selected scrapbook paper to decorate our first box. Applying this paper is a little complicated because you need to measure the dimensions and shape of each piece. In order to do this, we used a quilting mat and large ruler to ensure our dimensions were accurate. Then, we use mod podge to apply the paper to the box. We also paint a few coats of mod podge over the paper to ensure that it looks nice and stays put.

Finally, after another day of drying we put the hardware back onto the box and admired our first project!
old jewelry box

Since then, we have rescued around 20 different jewelry boxes from their 1950 dress and made them into contemporary pieces that anyone would want to have in their home!